Most creative design projects will require the use of images of one form or another. What those images are is, of course, dependent on the subject and the desired treatment of it but there is also a question of quality.
When choosing images, you want to aim for those that will be of the highest quality for the medium you’re using them in. That means obtaining or creating the images in the formats and sizes that are best for the job.
You must first decide whether a vector or raster format is the most appropriate.
Vector versus raster
What is a vector image?
A vector image is a digital image constructed using lines and fills. Its creator draws freehand or geometric shapes then fills them with the desired solid or graduated colours. They may set the outlines to be visible and give them thickness and colour, or to be of no width and thus invisible. Type might also be included if the image is, say, a logo or a diagram.
Vector images are, in theory, infinitely scalable without loss of quality, because they are mathematical constructions. The edges of shapes will remain perfectly crisp, smooth and defined, regardless of any enlargement or reduction made. These qualities make them ideal for non-photographic content such as logos and diagrams.
What is a raster image?
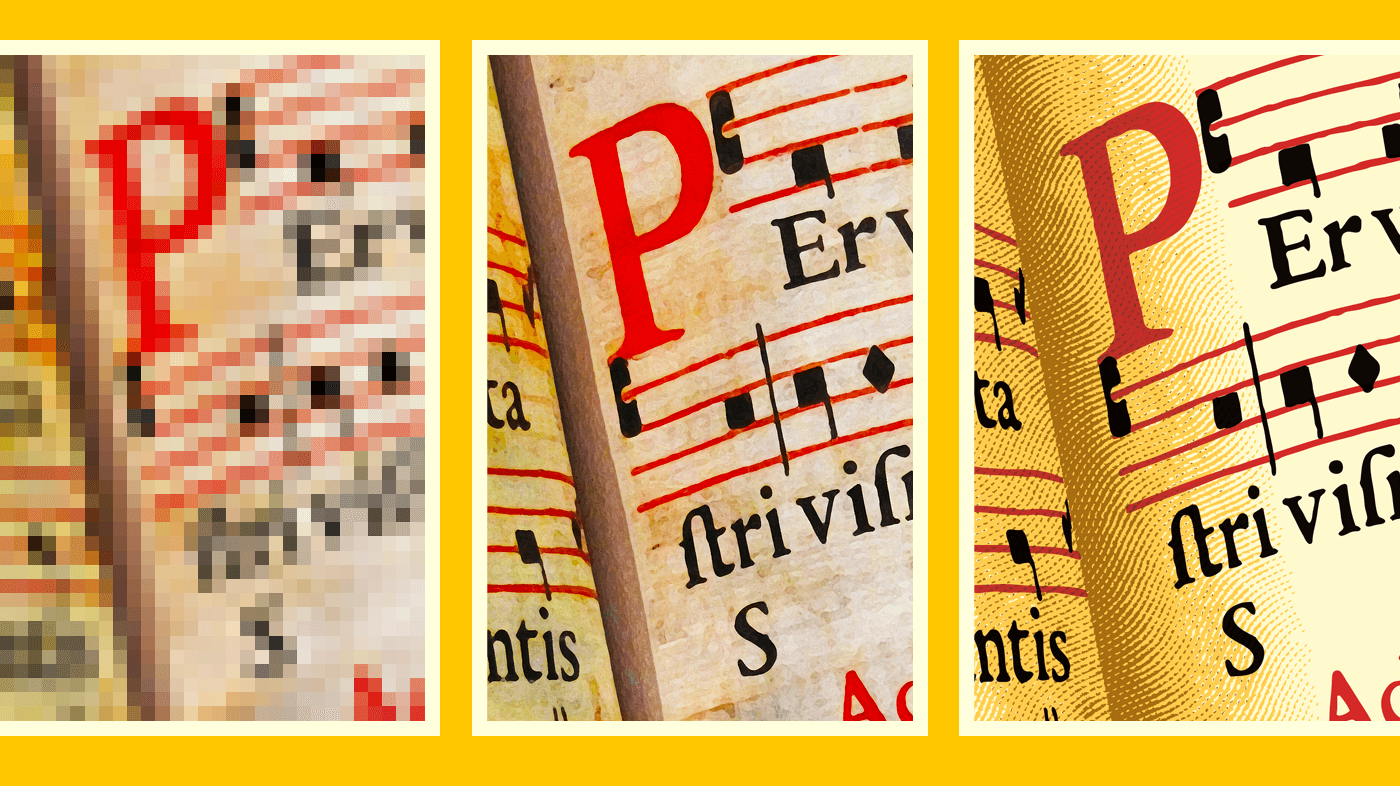
A raster (or bitmap) image is a digital image made up of blocks (or cells) of solid colour called pixels (short for picture cells). In these images, considerable photographic detail can be rendered, especially when the pixels are very small relative to the size of the image.
Unlike vector images, the concept of resolution plays an important part in the quality of a raster image. The resolution is the number of pixels there are in a given area. If an image doesn’t contain enough pixels for the area it is covering it can have a blocked (or pixelated) appearance.
File format can affect the quality of a raster image. The JPEG (.JPG) format allows for compression of the image data to reduce the file size, which can be useful. However, a JPEG image can suffer from jagged or smudgy areas known as artefacts if it is too heavily compressed. Saving the file in this way a further time can introduce more artefacts, making matters worse. Each round of saving in the format with compression applied degrades the image quality further. It’s very difficult to restore information (and therefore quality) once it has been taken out. There are AI (artificial intelligence) applications that can help with image restoration, but results are still mixed.
Image file formats and their uses
The most common and widely-supported image file formats are EPS, JPEG, TIFF, GIF, PNG, SVG and PSD. Each format is described below, along with its good and bad points.
EPS
EPS can be vector, raster or a combination of both, but its vector capability is its most useful feature.
For: You can use an EPS at any size if it contains only vector data, without editing and with no loss of quality. You can place one into a page layout document and output it to PDF or print. You can edit vector shapes and colours quickly and easily with the right software. The format supports special spot colours. You can convert it into any raster format in photo editing applications such as Adobe Photoshop. File size can be very small if there are few and simple shapes in the image.
Against: If there is a lot vector detail in the image, file size can be large. You can only view one in certain applications, and can only edit one in a dedicated vector graphics (drawing) package such as Adobe Illustrator or CorelDraw.
JPEG (or JPG)
JPEG is a raster format.
For: It allows for compression to reduce file sizes, which is good for file transfer and storage, e-mail and websites.
Against: It’s a lossy format—compression results in the loss of information, so image quality can suffer.
TIFF (or TIF)
TIFF, like JPEG, is a raster format.
For: It has no compression capability, so can be better quality than JPEG.
Against: The file size of a TIFF image will generally be larger than it would be in JPEG format because it can’t be compressed. Only a few specialist applications, such as those for image editing or page layout, can support it.
GIF
GIF is also raster, and is best for images with more limited textural variation. The widest use of this image format is on websites and apps.
For: You can keep the file size low, depending on how complicated the image is. Transparency is permitted—it’s possible to have areas of the image where what’s behind it shows through.
Against: Colour range is more limited than in other raster formats, so it’s not the best format for subtlety or detail.
PNG
PNG is a raster format the combines the subtlety of JPEG and TIFF with the transparency ability of GIF.
For: It’s particularly useful in screen presentations for ‘cut-out’ graphics, and in websites and apps for clean edges on transparent backgrounds (when in 24-bit format).
Against: It isn’t as widely supported as other formats.
SVG
SVG is a vector format, originally created for use on the Web.
For: You can use it at any size without editing, and with no loss of quality.
Against: It’s not as widely supported as EPS for certain applications.
PSD
PSD is the native file format of Adobe Photoshop. It is a raster format that can contain vector elements, including paths for cut-outs and masking.
For: This is the best raster file format for placement into Adobe InDesign documents for things like page layout. It supports a wide range of colour models, such as RGB, CMYK, indexed colour, greyscale and spot colour. You can arrange content in layers and save it this way, and can edit layers without affecting other ones.
Against: It’s not as widely supported as other formats. Sometimes you have to flatten it to make it useable, i.e. merge all the layers within it into a single, flat layer.
Resolution, size and colour mode
As I mentioned earlier, resolution is a key factor in the reproductive quality of a raster image. In addition to this, all media have their own current ideal resolution requirement. To get the best quality rendering of an image in a given medium, therefore, it is important to make sure its resolution is adequate for the job.
Each medium also has its standard colour mode—not using the right one can lead to unexpected and undesired results. With the right software or app you can easily and quickly change the colour mode of your image to suit what you’re using it for. However, it’s worth noting that RGB has a greater colour range than CMYK, so not all RGB shades are available in CMYK. Converting from RGB to CMYK will therefore result in the dulling of most vibrant or intense shades. The reverse, CMYK to RGB will have no adverse effects. Once you’ve converted an image from RGB to CMYK, converting back into RGB won’t restore the colour vibrancy.
The following is a guide to the ideal resolution and colour mode(s) for images in different media, where ppi is pixels per inch:
- Images for websites should be 72 ppi when at 100% size. They should be in RGB colour.
- Images for e-books, desktop printing and slides (Word, PowerPoint, etc) should be 150 ppi when at 100%. They should be in RGB colour.
- Images for digital or litho printing (e.g. for printed books) should be 300 ppi when at 100%. They should be in CMYK colour or greyscale. Litho and silk screen printing can also accommodate special spot colours, normally using assigned Pantone® references, making up the whole or part of the image.
- Images for large-format graphics, such as exhibition panels, should be around 72 ppi at 100% size (or 300 ppi at 25%), unless there is no photographic content (e.g. if it’s a type-only design), in which case vector artwork is best if available. These should be in CMYK colour.
Just a word about copyright
It’s vital to make sure you have permission to use an image that you haven’t created yourself. This will normally be by direct agreement with the copyright holder or through image licencing. Perhaps nobody will spot an image being used without permission, but is it worth taking the chance? You wouldn’t only risk having to cease using the image, bringing inconvenience and embarrassment. You could also suffer cost implications, damage to your reputation, and prosecution. It’s far better to know you’ve the right use your images wherever and whenever you need.
Need further knowledge or help?
If you need more information on this subject, or help with image conversion, don’t hesitate to get in touch anytime.


